
The articles included provide options for pulling attendance and grade data to help aide in determining athletic eligibility as well as a few options on ways to maintain team rosters in NCSIS.
Check out the professional learning webinar series for Athletic Webinars
The following reports can be used to aide in determining athletic eligibility for students.
Information regarding Interscholastic Athletics can be found on the Interscholastic Athletics | NC DPI website. Eligibility Requirements are listed in the information from this website.
Attendance Report
Navigation: Attendance Office > Reports > ADM and ADA Detail Report
The ADM and ADA Detail report displays each student's present and absent days for the date range specified when running the report.
ADM and ADA Detail | Infinite Campus
- Enter the Start and End Date for the semester prior.
- Select the Detail report type.
- Select Daily Approximation to review whole day absences.
- Choose CSV to export the report and open into Excel.
- Select which calendars to include (the calendar selected in the context is the default, but if the user has access to more than one calendar, more than one can be selected)
- Generate the report to export the data.
Each student will be listed with their membership days, absent days, and present dates for the date range selected. Review the Absent Days to help determine student eligibility.

Grades Report
Navigation: Reporting > Ad Hoc Reporting > Filter Designer
Posted Grades can be exported using an Ad Hoc filter. Using posted grades should be used instead of transcript grades, since mid-year averages are not included in the transcript grades. Use the information below to create an Ad Hoc for grade information. Please note that the filter options may vary based on the setup for the PSU/school. This report will provide one line per student per grade.
Semester 1 Grading Ad Hoc
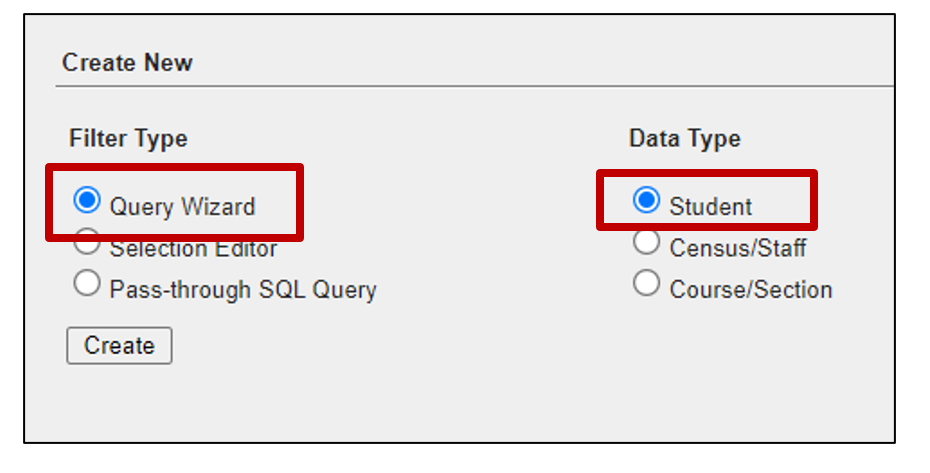
- Select Query Wizard as the Filter Type.
- Select Student as the Data Type.
- Click Create to begin.
- Enter a Name for the Query. Include the term in the name. Add a short description to help users know what is included in the filter.

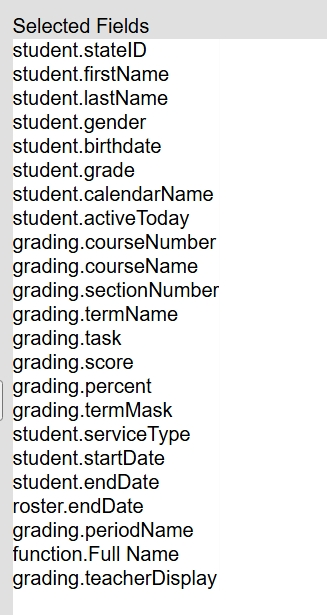
- Select the fields to include for the filter. Fields in the Grading portion are posted grades. Below are some recommended fields to include.
- Add a function to put the first and last name together: The constant value is a space.

- Add a function to put the first and last name together: The constant value is a space.
- Click Next to continue to the filter options.
- When selecting the filter options, you will need to know the grading tasks names, such as Semester Grade, Final Grade. These can be found in Grading & Standards > Grading Setup > Grading Task Setup. You will also need to know the term names, such as Q1, Q2. These can be found in Scheduling & Courses > Calendar Setup > Term Setup).
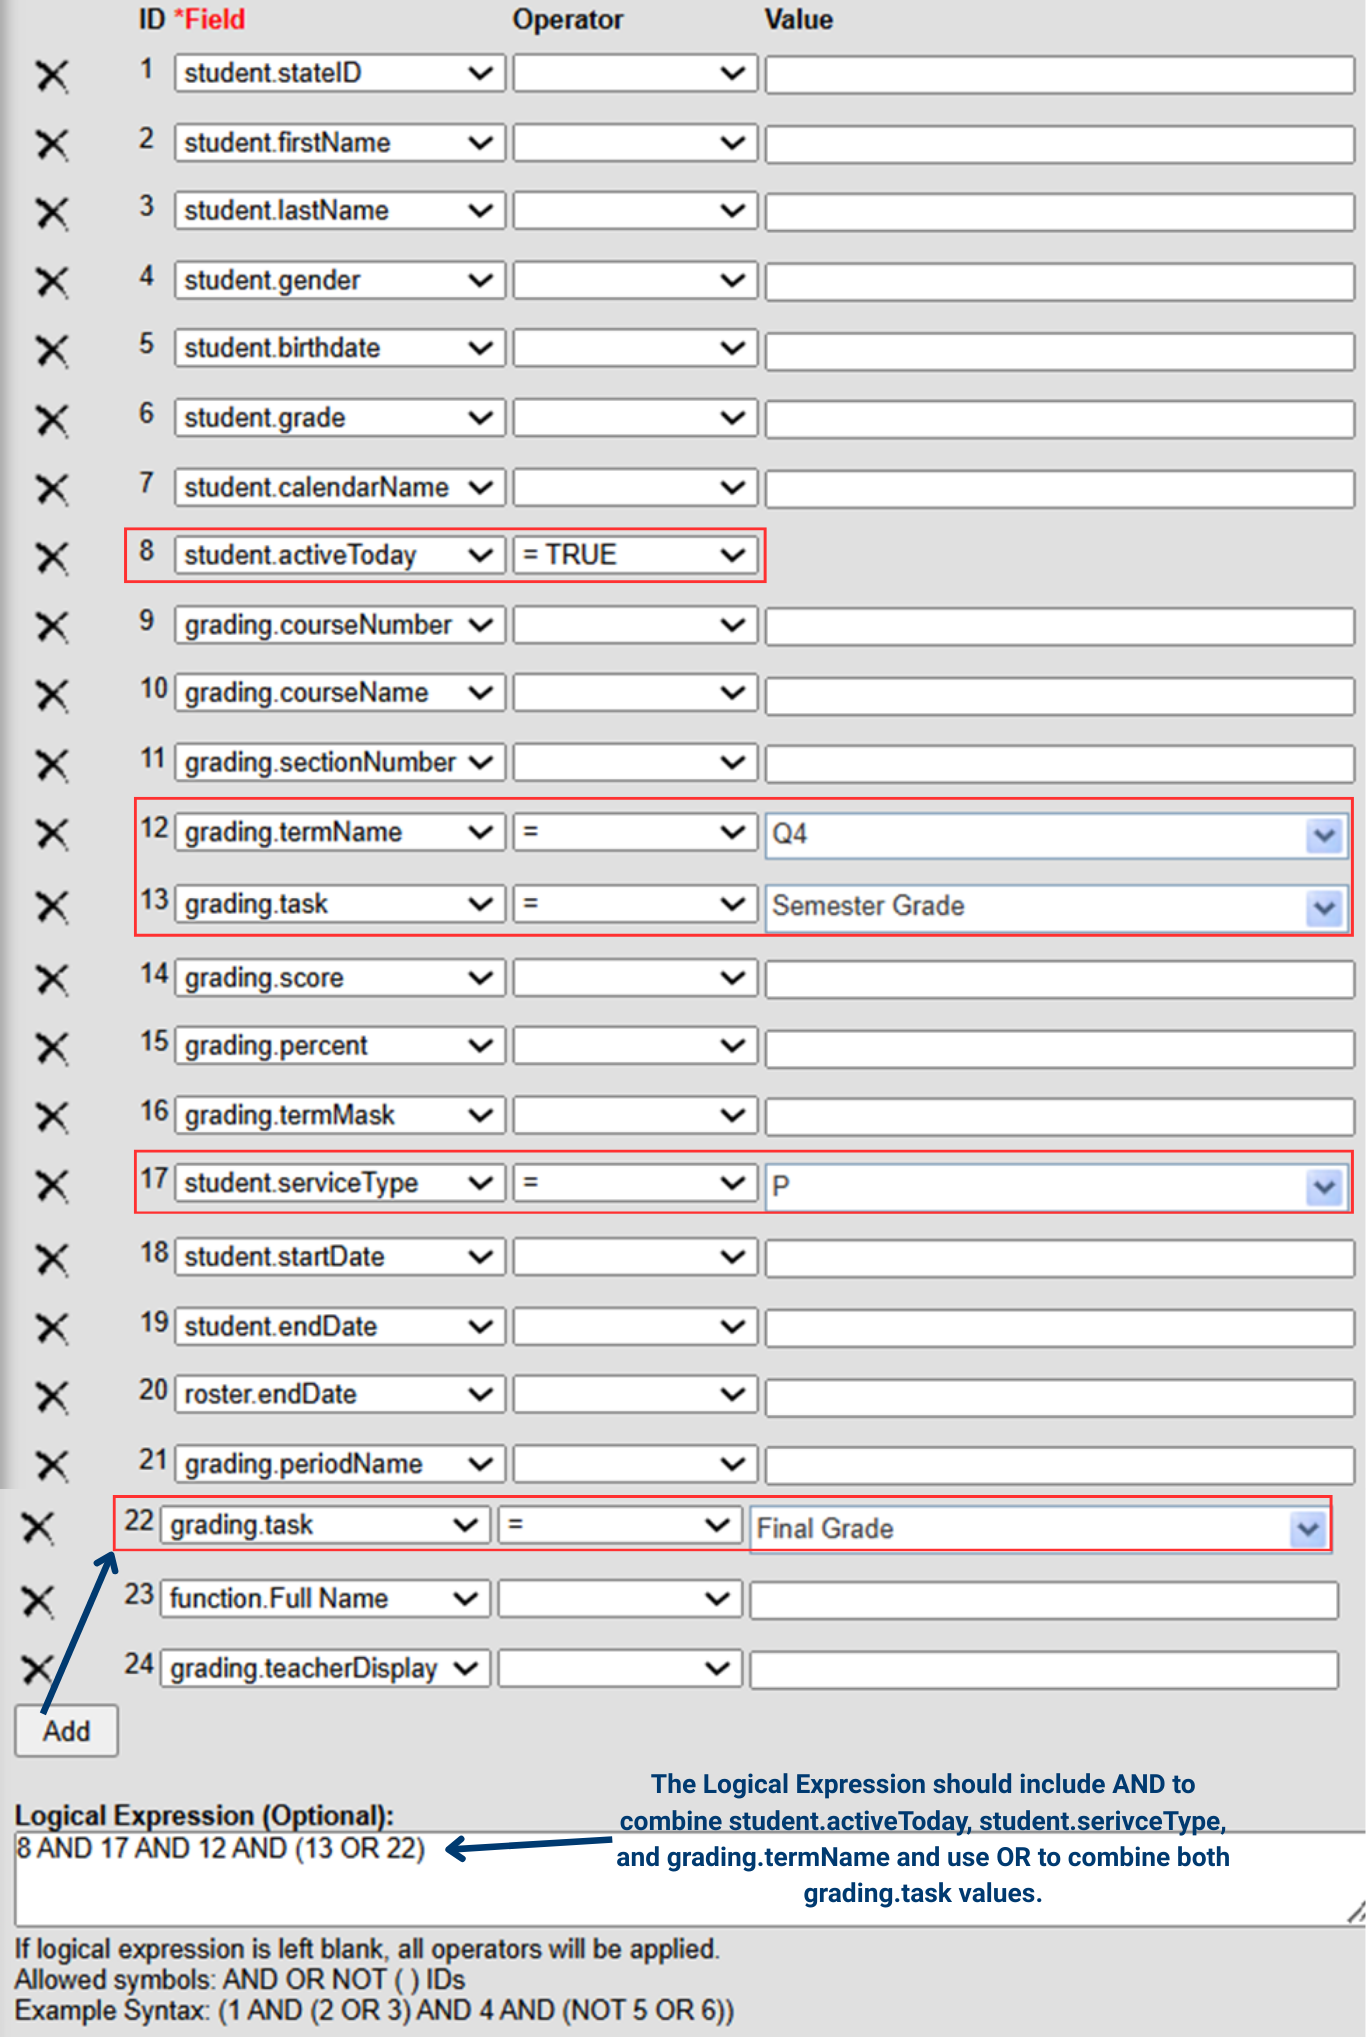
- To ensure you have the correct information, you will need to filter for active students with a primary enrollment and for grades in the corresponding term (i.e. Q2) and the corresponding grading task names (i.e. Semester Grade). Below are recommended filters.
- student.activeToday=TRUE
- student.serviceType=P
- grading.termName=Q2 - (this will be the term found in Term Setup for the school)
- grading.task=Semester Grade - (this will be the Grading Task name for the corresponding term)
- grading.task=Final Grade - (Remember to add another grading.task in the filter to include both semester and final grades)
- Remember when using more than one filter, a Logical Expression will be needed so the filter knows how to meet the criteria selected. The logical statement will depend on the ID for the field. In the example below, the student.activeToday ID is 8. So, when using it in a logical expression you will refer to ID 8.
- We need to tell the system how a student must meet the criteria listed in the filter. We need the student to be active today for the primary enrollment and include semester or final grades for the corresponding term. To accomplish this, the statement would be 8 AND 17 AND 12 AND (13 OR 22)
- Save & Test to ensure the filter is pulling the data as expected.
- Click Next to update the output of the data. Updating the columns with column header information so data is easier to view when exported.

- Click Save & Test to save this filter. Be sure to save the filter or a copy of the filter for the user group that will need access.


Semester 2 Grading Ad Hoc
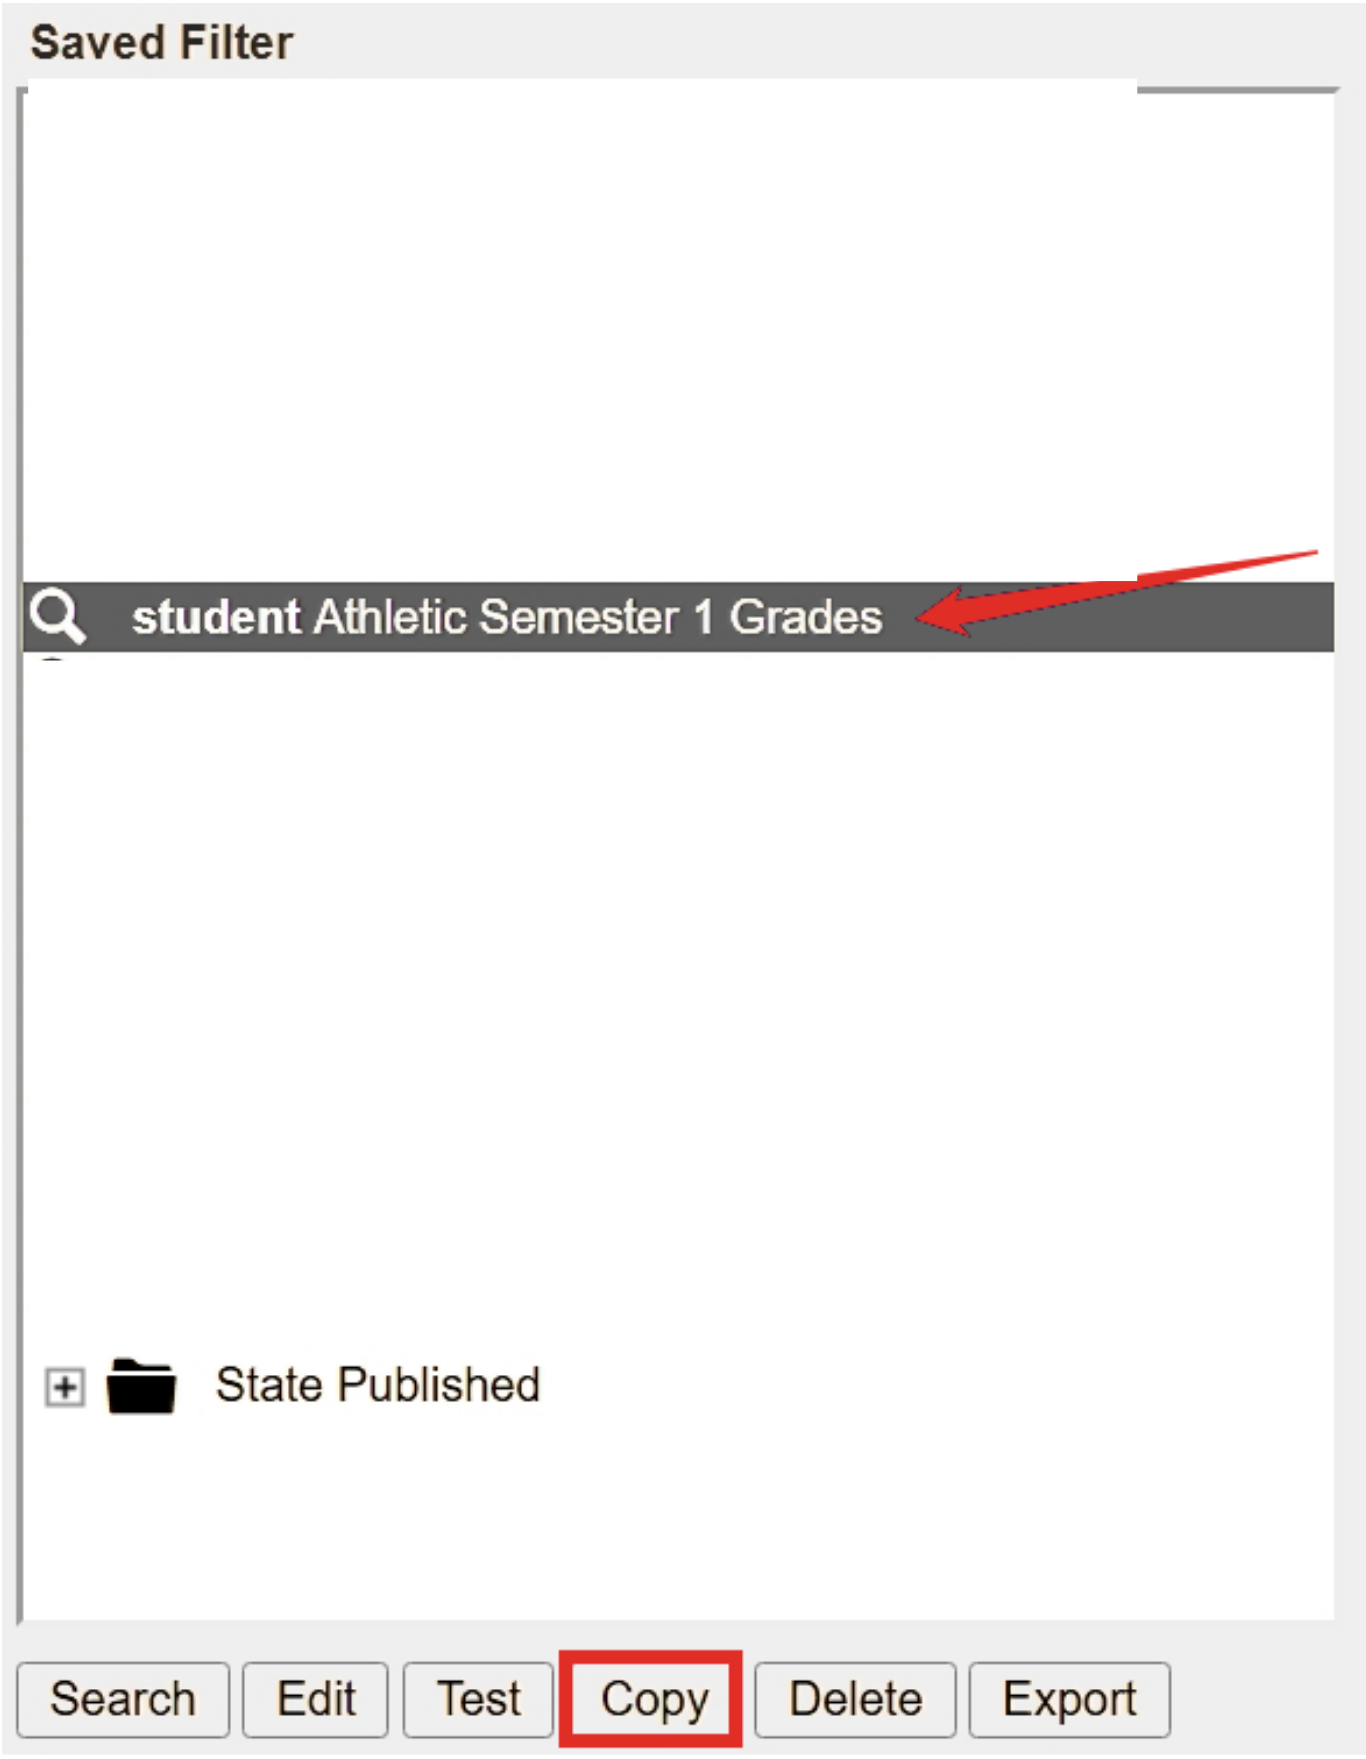
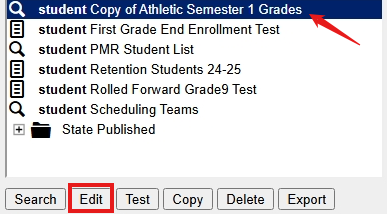
- Make a Copy of the Semester 1 Grading Ad Hoc filter by selecting the saved filter and clicking Copy. A message stating that the filter was copied will display. Click OK to copy the filter.
-
Click on the copied Filter and click Edit.
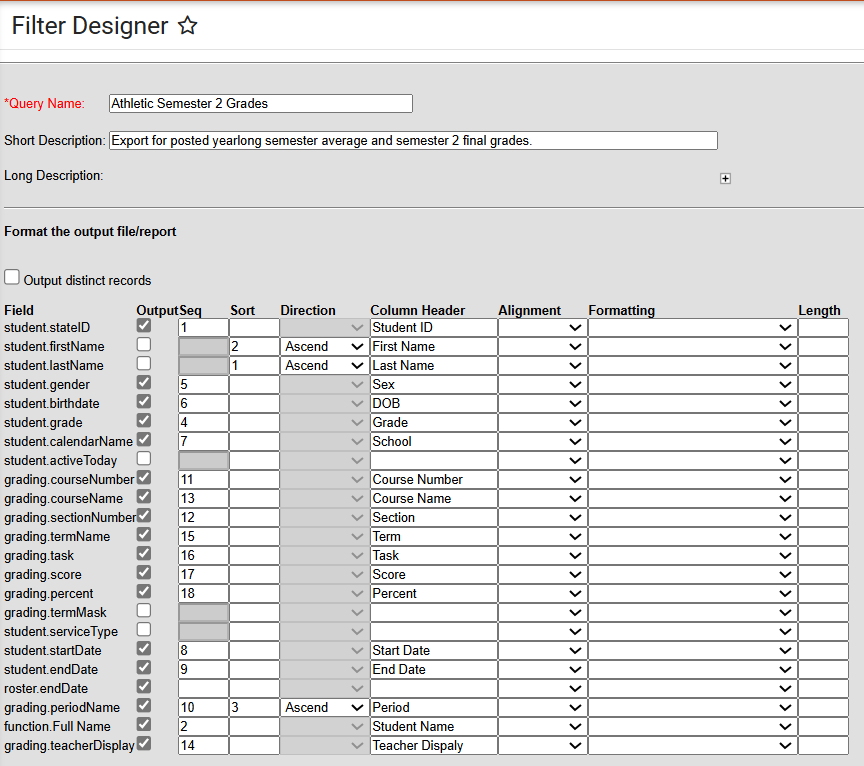
- Update the Name of the Filter to reflect the correct semester.

- The fields included are the same, however the filter selection will need to be adjusted for the corresponding term.
- To ensure you have the correct information, you will need to filter for active students with a primary enrollment and for grades in the corresponding term (i.e. Q2) and the corresponding grading task names (i.e. Semester Grade). Below are recommended filters.
- student.activeToday=TRUE
- student.serviceType=P
- grading.termName=Q2 - (this will be the term found in Term Setup for the school)
- grading.task=Semester Grade - (this will be the Grading Task name for the corresponding term)
- grading.task=Final Grade - (Remember to add another grading.task in the filter to include both semester and final grades)
- Remember when using more than one filter, a Logical Expression will be needed so the filter knows how to meet the criteria selected. The logical statement will depend on the ID for the field. In the example below, the student.activeToday ID is 8. So, when using it in a logical expression you will refer to ID 8.
- We need to tell the system how a student must meet the selected filter. We need the student to be active today for the primary enrollment and include semester or final grades for the corresponding term. To accomplish this, the statement would be 8 AND 17 AND 12 AND (13 OR 22)
- To ensure you have the correct information, you will need to filter for active students with a primary enrollment and for grades in the corresponding term (i.e. Q2) and the corresponding grading task names (i.e. Semester Grade). Below are recommended filters.
- Save & Test to ensure the filter is pulling the data as expected.
- Click Next to update the output of the data. Updating the columns with column header information so data is easier to view when exported.
- Click Save & Test to save this filter. Be sure to save the filter or a copy of the filter for the user group that will need access.


Once the filters are created navigate to Reporting > Ad Hoc Reporting > Data Export, select the filter and format to export. The recommended file type is Delimited values (CSV).
Provide the reports to staff as needed.
There are a few different ways teams can be managed in NCSIS. The following article will provide a few options for managing teams.
Ad Hoc Filters
This option uses the ad hoc filter selection editor to select individual students. This option does not assign any information to the student's record, only provides a way for staff to search and select students included in the team filter. One filter per team will need to be created.
Navigation: Reporting > Ad Hoc Reporting > Filter Designer
- Select Selection Editor as the Filter Type.
- Select Student as the Data Type.
- Click Create to begin.

- Add the Team Name in the Selection Editor. TIP: Include the year and school initials in the name or short description to maintain the selection even after the year has ended.
- Use the Quick Search section to filter to a grade, enter names, or change the sort.
- Select each student and click the arrow to move the student to the selected students list.
- Select a user group for other users to have access or save to the user account.
- Click Save once all students are added to the selection.


Once the filter is created, use the Edit option to add or remove students. This filter is available to the users connected to the user group and can be used in various tools in NCSIS, such as student search and attendance entry wizard.

Activity Courses
This option uses courses and periods to assign students to rosters for the corresponding team. The setup for this option includes having an activity code for a course, an activity period in the period schedule, a non-reporting course and section for the team, section staff, and scheduling students in sections. This option will assign students to the course which will be visible in the parent and student portal.
Activity Setup | Period Setup | Course Master Setup | Add Course | Create Section | Schedule Individual Students | Schedule Students in Mass
Activity Setup
An activity of AT Athletic will need to be added to the Activity Core Attribute/Dictionary to define the course as an activity. This is used for the Activity tool in NCSIS.
Navigation: System Settings > Custom Data and Links > Core/Attribute Dictionary
-
Locate Course in the list.
-
Click the + to expand the details.
-
Locate Activity in the list.
-
Click the + to expand the details.
-
Click on Dictionary to open the activity dictionary detail.
-
Enter AT as the.
-
Enter Athletic as the name.
-
Click Save to update the dictionary.

Period Setup
A non-instructional period will be needed to schedule the non-reporting course.
Navigation: Scheduling & Courses > Calendar Setup > Period Setup
- Select the period schedule in period setup.
- Click Add Period.
- Add a name and sequence to the period. The name and sequence will vary per PSU.
- Check Non-Instructional to ensure the period is not included in instructional time for the school day.
- Click Save Period Schedules to update.
- Ensure each period schedule includes the non-instructional period.

Course Master Setup
A non-reporting course will be needed. PSUs can decide the best option for courses that will fit the needs of their PSU. A few examples are:
- One course for all athletics. Each section can have the teacher display field updated to the designated team.
- One course per team. If a course master does not exist for a "team" a copy of the 99359X0 course master should be created.
Once the course master is created, the course will need to be added to each school that will use the course to manage teams.
Copy Course Master
Navigation: Grading & Standards > Course Masters > Copy Course Master
- Search for the 99359X0 Non-Reporting course master. If a course master is not selected, click Open Course Master Search to search for the course master. If a course master was already selected, the copy course master tool will open automatically.
- Select the 99359X0 Non-Reporting course master from the search menu.

- Update the Course Master Name to be the athletic team's name. Example: Men's Varsity Basketball.
- If the PSU will have one course master for all teams, update the name to be more generic.
- If the PSU will have one course master for each athletic team, update the name to the corresponding athletic team.
- Update the Course Master Number to include the last 3 digits that reflect the PSUs local course code procedure. Example: 99359X0MBB or 99359X0AT
- Use the Add option to create more than one course master if needed.
- Click Save once course master(s) are created.


Update Course Master Information
Once the course master(s) are created, navigate to the Course Master Information Screen to select the activity.
Navigation: Grading & Standards > Course Masters > Course Master Information.
- Locate the Course Setup section in course information.
- Select AT: Athletic from the Activity dropdown menu.
- Update any other course information as needed. The transcript checkbox can be unchecked as this will not be a course that will ever have a final grade.
- Click Save to update the course information.

Add Course to School
Once the course master(s) are created and the activity added to course information, navigate to the school calendar that will be using the courses to add the course.
Navigation: Scheduling & Courses > Courses > Add Course
-
Search for the 99359X0 Non-Reporting course master(s) that were just created.
-
Check the box next to each course to be add to the school.
-
Click Add and then Continue to add the course to the school.

Create Sections
Once courses are added to the school, sections will need to be created.
Navigation: Scheduling & Courses > Courses > Course Sections > Add a Section
-
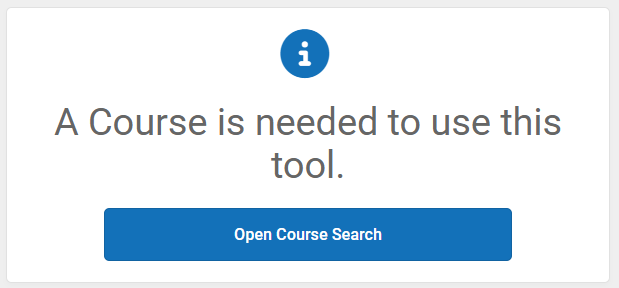
Search for the 99359X0 course(s) that were just added. If a course is not selected, click Open Course Search to search for the course. If a course was already selected, the course sections tool will open automatically.
-
Select the correct 99359X0 course from the search menu.
-
Click Add a Section.

-
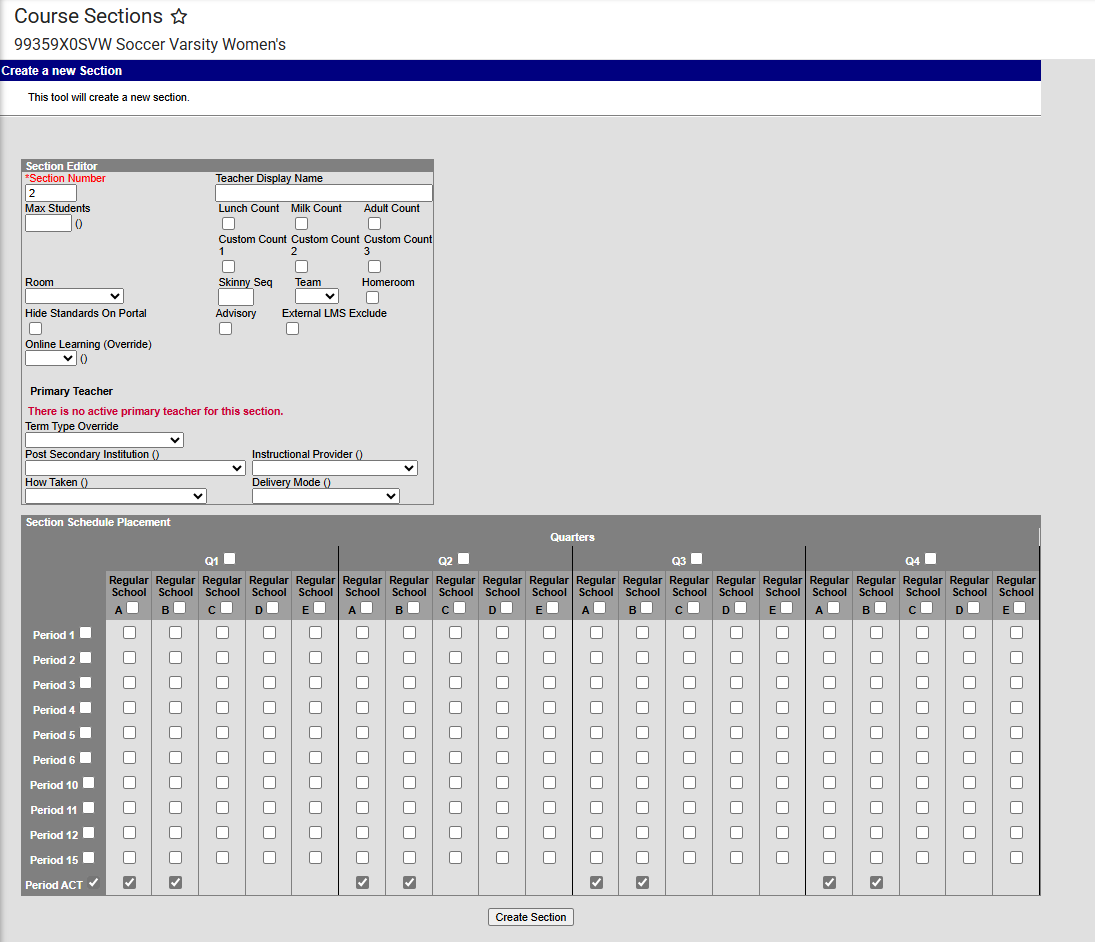
Enter a section number. Each section number must be unique for the course code.
-
If one athletic team course is being used, use the Teacher Display Name field to add the Team. Example: Women's Varsity Basketball. If more than one course is being used, this is not necessary.
-
Check the box for the non-instructional period created for athletics in the section schedule placement.
-
Click Create Section to add the section.
-
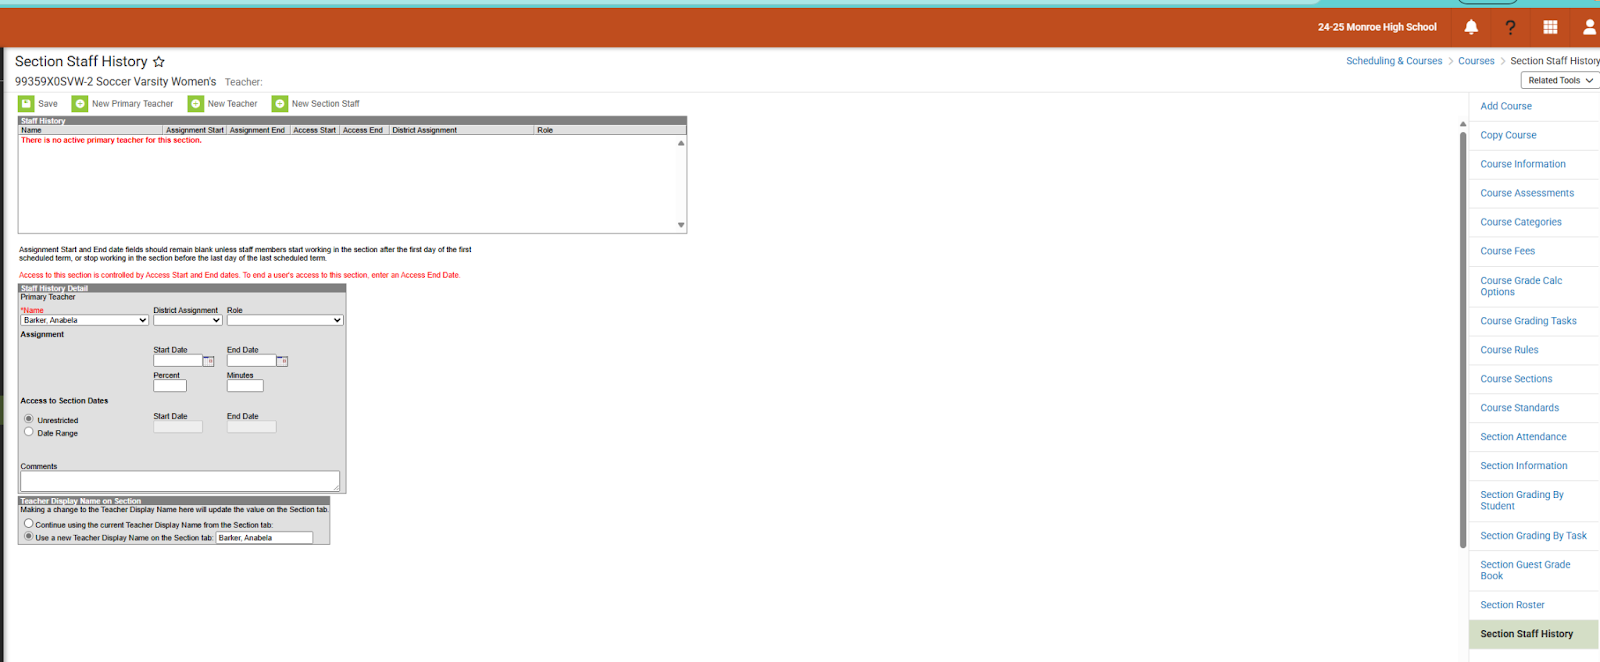
OPTIONAL: Use Related Tools to navigate to Section Staff History. *NOTE: Check with third party programs for any issues related to sections without primary teachers.
-
OPTIONAL: Add a Primary teacher to the section. This can be a coach or athletic director based on your PSUs procedures.
-
The tool rights associated to the staff will allow the staff member to see those students assigned to this section.
-
-
OPTIONAL: Click Save to update the primary teacher.


Add Individual Students to Sections
Once sections have been created for each team, students can be added. This can be done by using Walk-in Scheduler for individual students or Requests & Rosters to add multiple students.
Navigation: Student Information > General > Schedule > Walk-in Scheduler
Select a Student: If a student is not selected, click Open Student Search tool to search by the student's name. Search for student's using advanced searches or Ad Hoc Filters as needed. Select the student's name to open the Walk-in Scheduler tool. If a student was already selected, the Walk-in Scheduler tool will open automatically.

- Click on the No Scheduled Course box in the non-instructional period to search for all available team sections. The Search feature can also be used to search by the course code or name.
- Select the course/section to add the team to the student's schedule.
- If the student will be in the section the full term, no effective date is needed. If the effective date is after the section started, enter the correct effective date.
- Click Save to add the section to the student's schedule.

Add the section for each student that is a member of the team.
Batch Edit Rosters
Once sections have been created for each team, students can be added. Use the Requests & Rosters tool to add multiple students to the section.
Navigation: Scheduling & Courses > Scheduling > Requests & Rosters
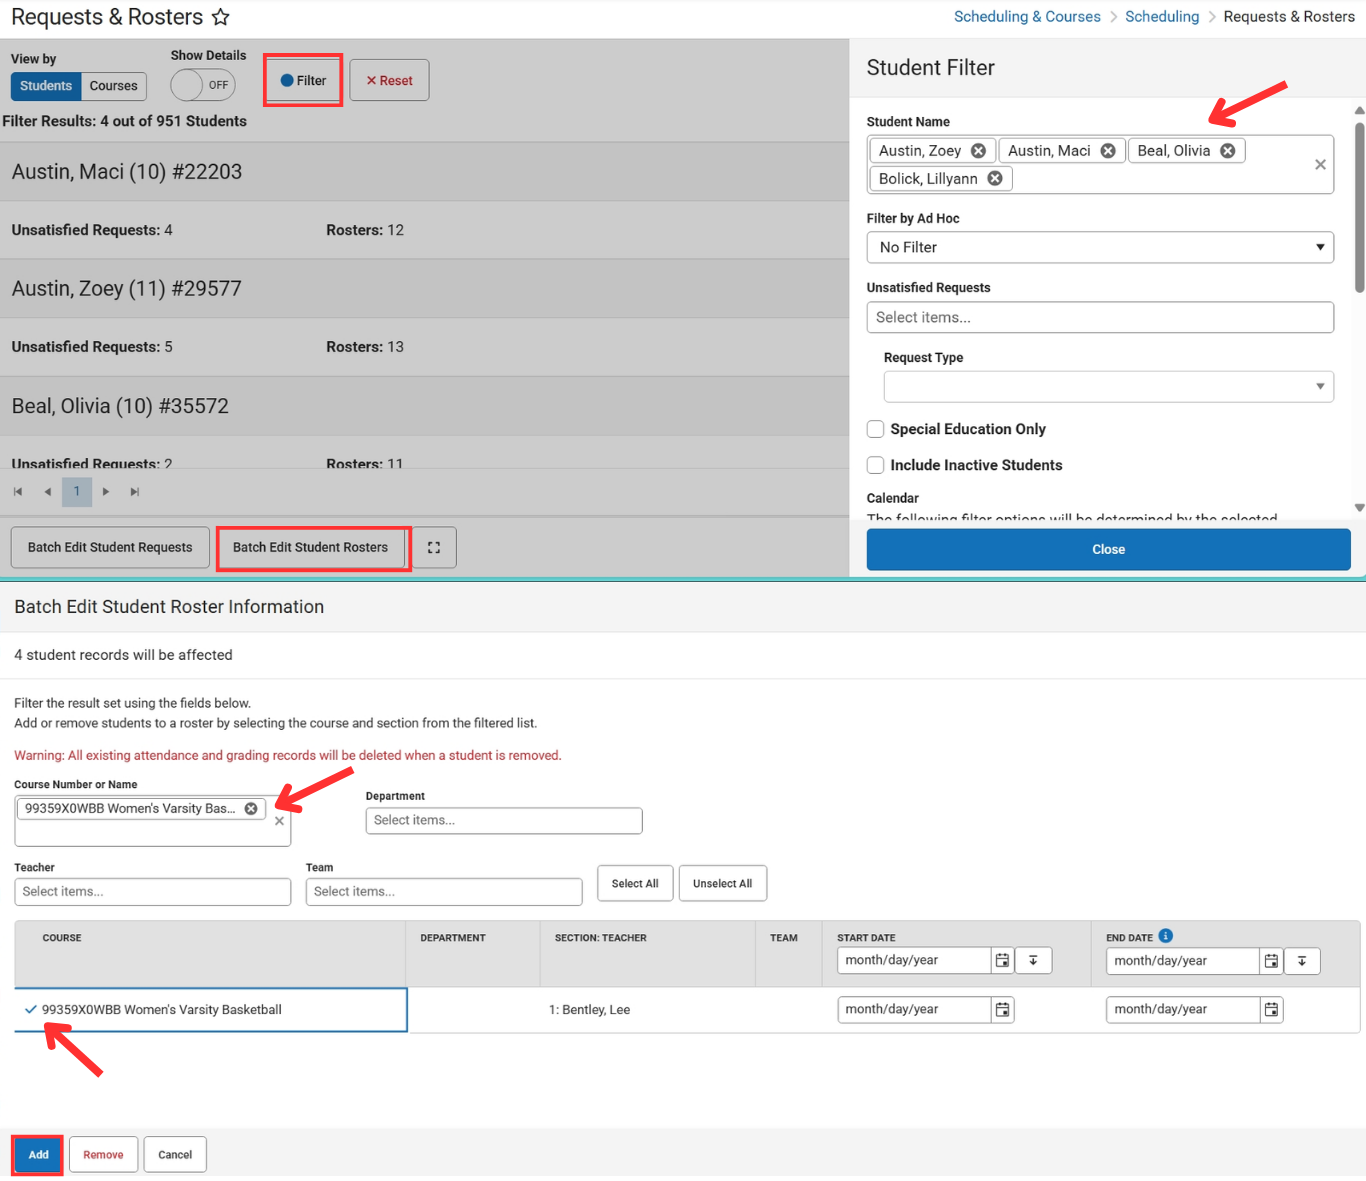
Students View
- Select the Students view.
- In the Student's View use the filter to select the group of students.
- Click Close once all students are selected.
- Click Batch Edit Student Rosters.
- Use the filters to select the course section.
- The start date should only be added if the students will begin in the section after the term of the section has started. Otherwise, the start date can be left blank indicating the students will be in the section the full term.
- Click Add to the selected students to the selected course/sections.
Courses View
- Select the Courses view.
- In the courses view use the filter to select the course.
- Click Close once the course is selected.
- Click Batch Edit Course Rosters.
- Click on the student's name to select the students. Students will be moved to the top of the student list and have a blue checkmark next to their name.
- The start date should only be added if the students will begin in the section after the term of the section has started. Otherwise, the start date can be left blank indicating the students will be in the section the full term.
- Click Add to the selected course to the selected students.

The use of this option allows users to search for the team in course/sections, courses and sections can roll forward each school year, and the course/section is visible in the student/parent portal. The course/section can also be selected in the attendance entry wizard tool to work with the rostered student's and attendance.
The Activity added to the course, can be used in the Activity Eligibility Report. For more information on this report, please see the Activity Eligibility | Infinite Campus article.
Team Programs
This option uses program sessions to maintain athletic teams in NCSIS. The setup for this option uses programs, program sessions, and flags.
Occurrence Setup | Location Setup | Category Setup | Program Setup | Program Session Setup | Flag Setup | Individual Student Program Assignment | Batch Student Program Assignment | Create Program Filter
Program Session Occurrence Setup
Create Program Sessions for each sport season.
Navigation: System Settings > Custom Data and Links > Core/Attribute Dictionary
-
Locate ProgramSession in the list.
-
Click the + to expand the details.
-
Locate Occurrence in the list.
-
Click the + to expand the details.
-
Click on Dictionary to open the occurrence dictionary detail.
-
Click Add Row to add each occurrence.
-
Add the following occurrences using Code and Name
-
FA - Fall
-
SP - Spring
-
WT - Winter
-
-
Click Save to update the dictionary.

Program Session Location Setup
Create Locations for each participating school.
Navigation: System Settings > Custom Data and Links > Core/Attribute Dictionary
-
Locate ProgramSession in the list.
-
Click the + to expand the details.
-
Locate Location in the list.
-
Click the + to expand the details.
-
Click on Dictionary to open the location dictionary detail.
-
Click Add Row to add each participating school.
-
Each school will need a code, this can be the school number or school initials and Name. It is recommended that the name is the full school name.
-
Once all participating schools are added, click Save to update the dictionary.

Program Category Setup
Create an Athletics category for the program.
Navigation: System Settings > Custom Data and Links > Core/Attribute Dictionary
-
Locate Program in the list.
-
Click the + to expand the details.
-
Locate Program Category in the list.
-
Click the + to expand the details.
-
Click on Dictionary to open the program category dictionary detail.
-
Click Add Row to add the category. Enter AT as the code and Athletics as the Name.
-
Click Save to update the dictionary.

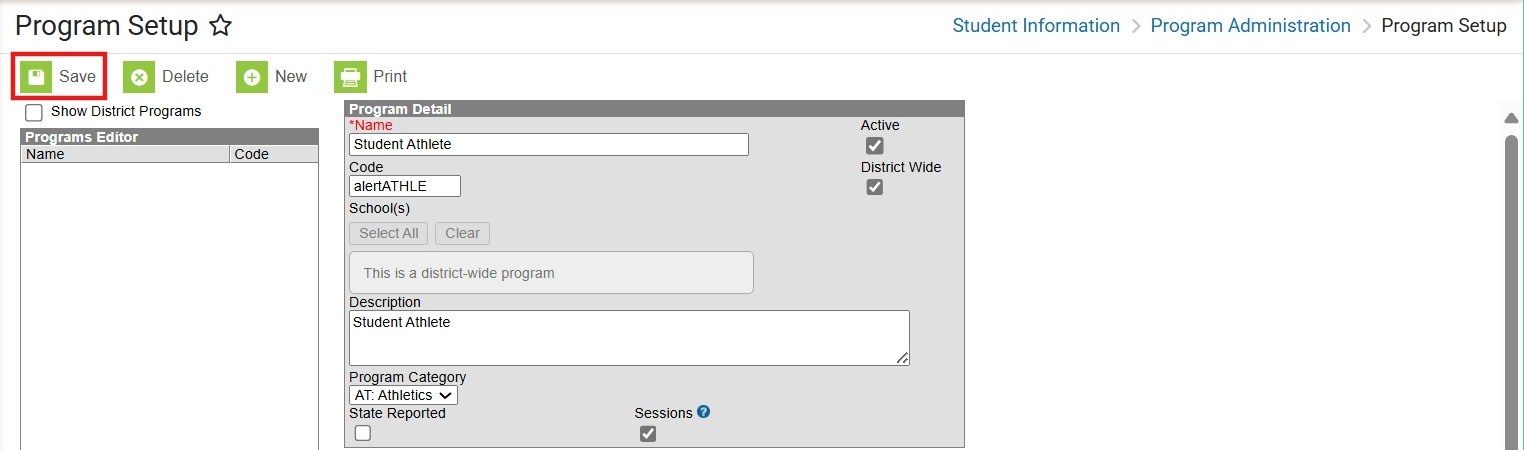
Program Setup
Create a student athlete program.
Navigation: Student Information > Program Administration > Program Setup
-
Click New to add the new program.
-
Enter the Student Athlete in the name.
-
The Active checkbox should be checked
-
Add a Code of alertATHLE.
-
This program can be set as District Wide by checking the checkbox. When adding program sessions, the location can be used to determine which school.
-
If the district wide box is not checked, click in the Schools area and select one or more schools where the program will be used.
-
-
Add in the description Student Athlete.
-
Choose AT: Athletics from the category dropdown.
-
The State Reported box should be unchecked.
-
Check the box for Sessions.
-
Click Save to add the program.
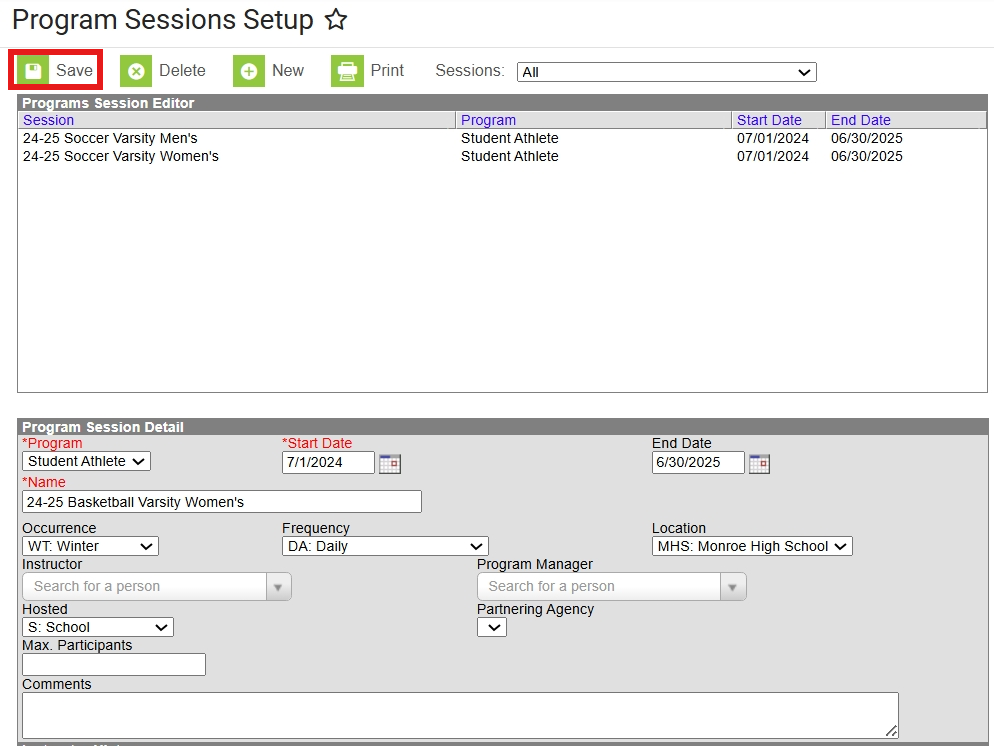
Program Session Setup
Create a program sessions for each athletic team.
Navigation: Student Information > Program Administration > Program Sessions Setup
-
Click New to add a new program session.
-
Select Student Athlete from the program dropdown menu.
-
Enter the Start Date of the program session. The start date can reflect when the team will occur in the school year or can be set to 7/1/20YY.
-
Leave the End Date unpopulated to allow the session to be used in any year.
-
Enter the name of the program session. Each PSU can decide a naming convention for each athletic team. It is recommended to include the school initials so users will be able to select the correct team. Examples: MHS Women's Varsity Basketball, MHS Basketball Varsity Women's
-
Select the corresponding Occurrence for the athletic team season, FA, WT, SP.
-
Select a Frequency that corresponds to the athletic team.
-
Select a Location (school) that corresponds to the athletic team. If more than one school has the same team, one program session for each school will be needed.
-
Add an Instructor (coach) - Optional
-
This does not need to be a staff person; it can be anyone available for selection in Census.
-
-
Select S: School from the Hosted dropdown menu.
-
Any fields not included above are optional and do not need to be completed.
-
Click Save to add the athletic team program.
-
Complete the steps above for each athletic team needed for each school location.
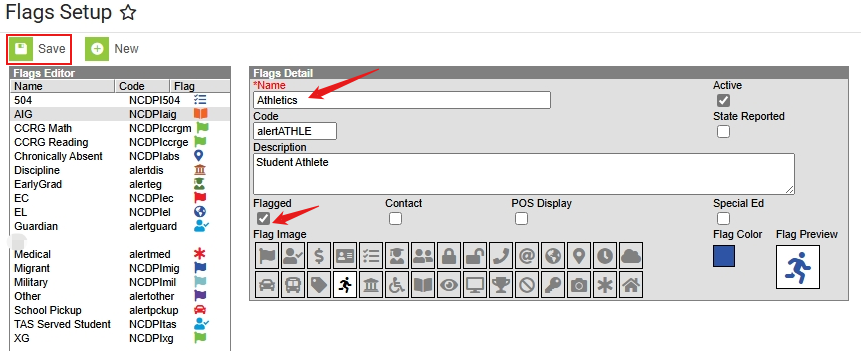
Flag Setup (Optional)
A flag can be created to be added to student's based on the student athlete program.
Navigation: Student Information > Program Administration > Flags Setup
-
Click New to add a new flag.
-
Enter a name for the flag. Example: Athletics or Athlete
-
Add the same code used for the Student Athlete program, alertATHLE
-
Check the Active checkbox.
-
Enter a description. Example: Student Athlete.
-
Check the Flagged checkbox.
-
Select a flag image.
-
Select a flag color.
-
Click Save to add the flag.
Assign Program Sessions to Individual Students
Once the program sessions are created, students can be assigned to the programs and if the PSU is using flags, assign flags.
Assign Programs
Navigation: Student Information > General > Programs
-
Click New to add a new program session.
-
Select Student Athlete from the program dropdown menu.
-
Select the correct Program Session (athletic team) from the dropdown menu.
-
Enter a Start Date. The start date can reflect when the team will occur in the school year or can be set to the first day of the school year.
-
Enter an End Date. The end date can reflect when the team will end in the school year or can be set to the last day of the school year.
-
Click Save to add the program session to the student.

Assign Athletic Flag to Individual Students (Optional)
Navigation: Student Information > General > Flags
-
Click New to add a new flag.
-
Select the Athletics flag or corresponding flag created by the PSU.
-
Enter a Start Date. This date should be the same as the program start date.
-
Enter an End Date. This date should be the same as the program end date.
-
Click Save to add the flag for the student.
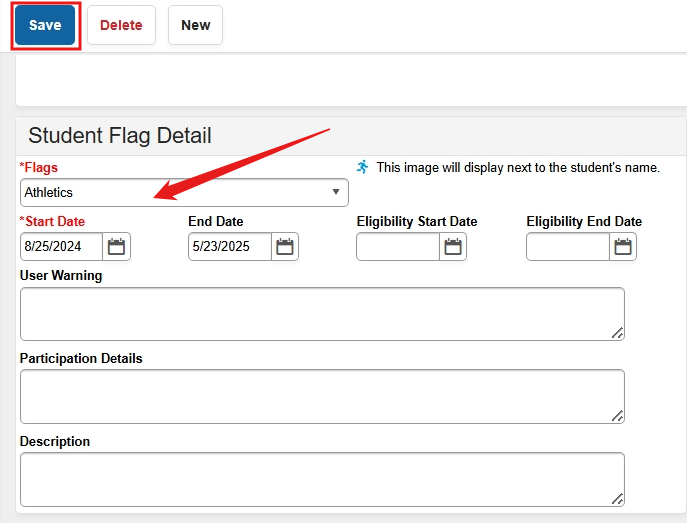
The flag will display under the student's name in all tools.

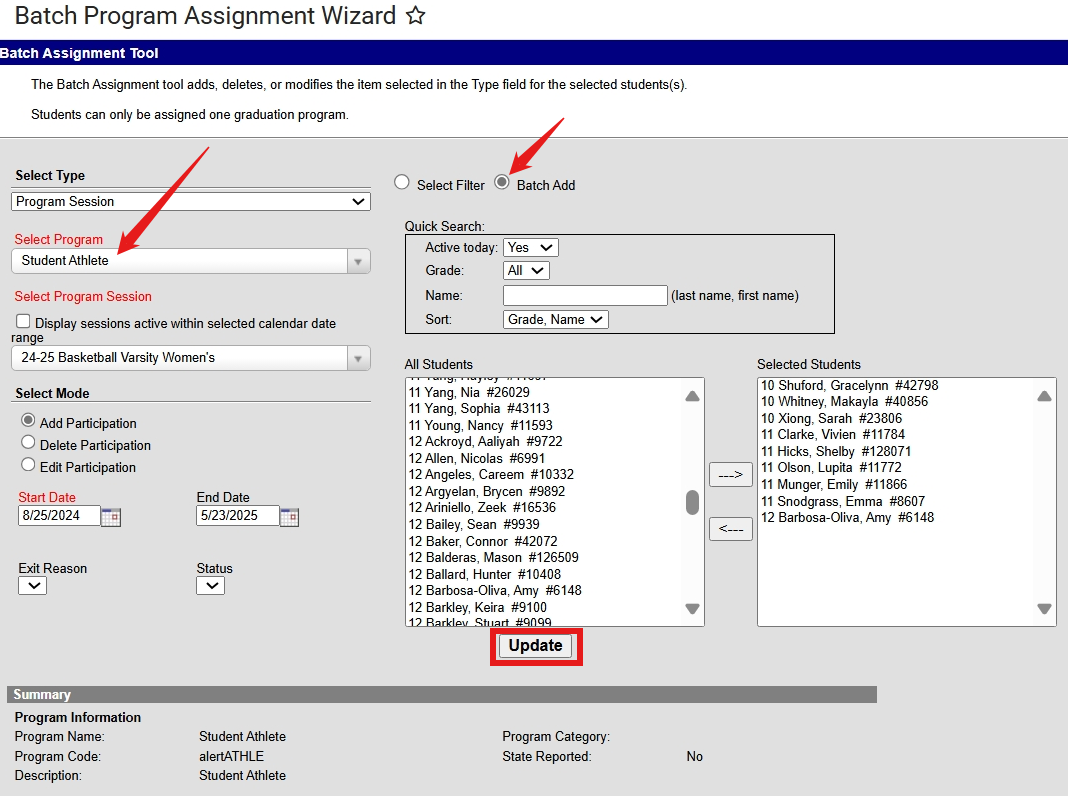
Assign Program Sessions to Multiple Students
Programs can also be assigned to students in mass.
Navigation: Student Information > Program Administration > Batch Program Assignment Wizard
-
Select Program Session from the type dropdown.
-
Select Student Athlete as the program.
-
Select the corresponding team program session.
-
Select Add Participation from the mode.
-
Enter a Start Date. The start date can reflect when the team will occur in the school year or can be set to the first day of the school year.
-
Enter an End Date. The end date can reflect when the team will end in the school year or can be set to the last day of the school year.
-
Select Batch Add to select the students to include.
-
Click a student name and then the right arrow to add the student to the selection.
-
Click Update to add the program to the selected students.
Assign Athletic Flag to Multiple Students (Optional)
The Flag can also be added in mass. TIP: Assigning the flag directly after the program, will retain the student selection when using Batch Add.
Navigation: Student Information > Program Administration > Batch Program Assignment Wizard
-
Select Flag from the type dropdown.
-
Select Athletics (or the flag name used for athletics) from the program dropdown.
-
Enter a Start Date. This date should be the same as the program start date.
-
Enter an End Date. This date should be the same as the program end date.
-
Select Batch Add to select the students to include. NOTE: If performing this process directly after assigning the program, the student selection should be the same. If the student selection is correct, skip to step 7.
-
Click a student name and then the right arrow to add the student to the selection.
-
Click Update to add the program to the selected students.

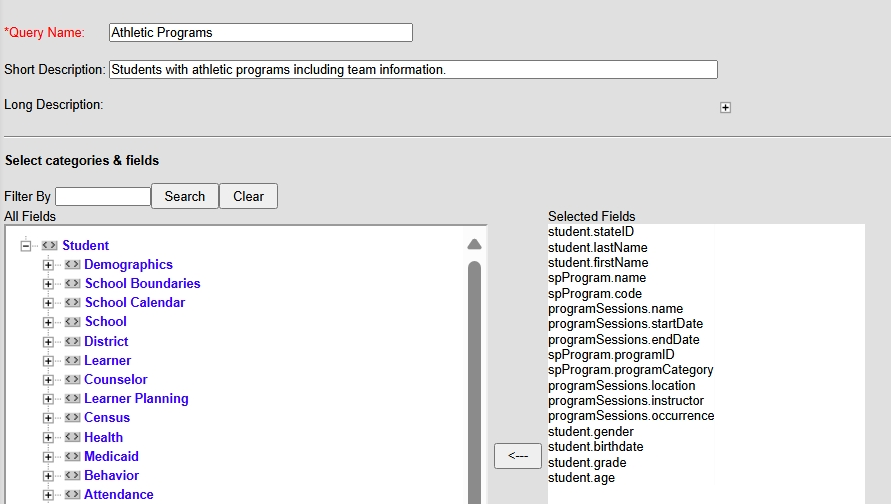
Create an Ad Hoc for the Student Athlete Program (Optional)
Once programs are assigned to students, an ad hoc that includes all program information can be created.
Navigation: Reporting > Ad Hoc Reporting > Filter Designer
-
Select Query Wizard as the filter type.
-
Select Student as the data type.
-
Select Create.
-
Enter a name for the Query. Be specific so if the filter is shared with other users, they will know what information will be included in the filter.
-
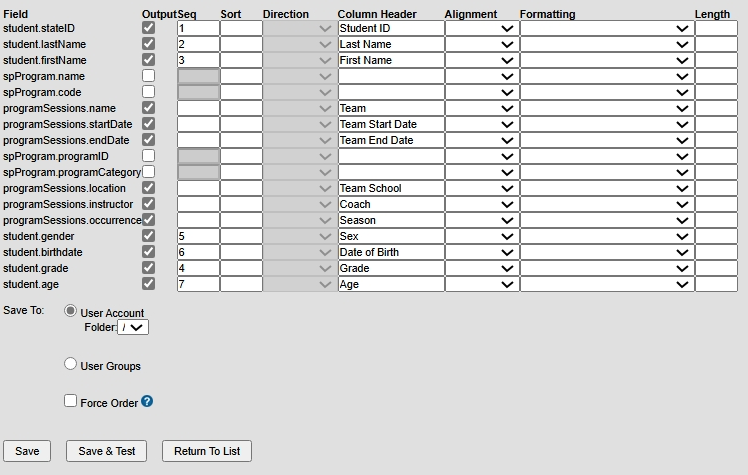
Select the fields to include in the filter. Below is an example of some of the fields that can be included. Be sure to include student information and program session information.
-
Click Next to filter the data.
-
Locate the spProgram.name field and update the operator and value as follows: spProgram.name=Student Athlete (this would be the name of the program)
-
Other filter parameters may include the session dates, locations, or names. TIP: Create one filter for all athletic programs, then copy the filter to narrow to a specific team and/or school.
-
-
Click Save & Test to ensure the information included are students in the student athlete program.
-
Click Next to update the output information in the event that the filter is exported. Below is an example of output information.
-
Click Save & Test to save this filter. Be sure to save the filter or a copy of the filter for the user group that will need access.


